Project Dashboard Overview
Learn how to use the Project Dashboard to preview, build, clone, and configure your AVstudio projects from one place.
This article introduces the core controls and navigation within the Project Dashboard, covering quick actions, project creation, live previews, builds, settings, and environment selection.
Project Management from the Dashboard
You can manage your projects directly from the dashboard using the controls shown below.

① New Project
Click the + New Project button in the upper right corner to open the project creation window.
② Edit
Click the Edit icon on a project card to open the full Project Dashboard.
③ Project Menu
Click the ☰ (hamburger icon) to access quick actions for the project:
- Clone Project
- Delete Project
Creating a New Project
When you click + New Project, the Create New Project modal will appear.
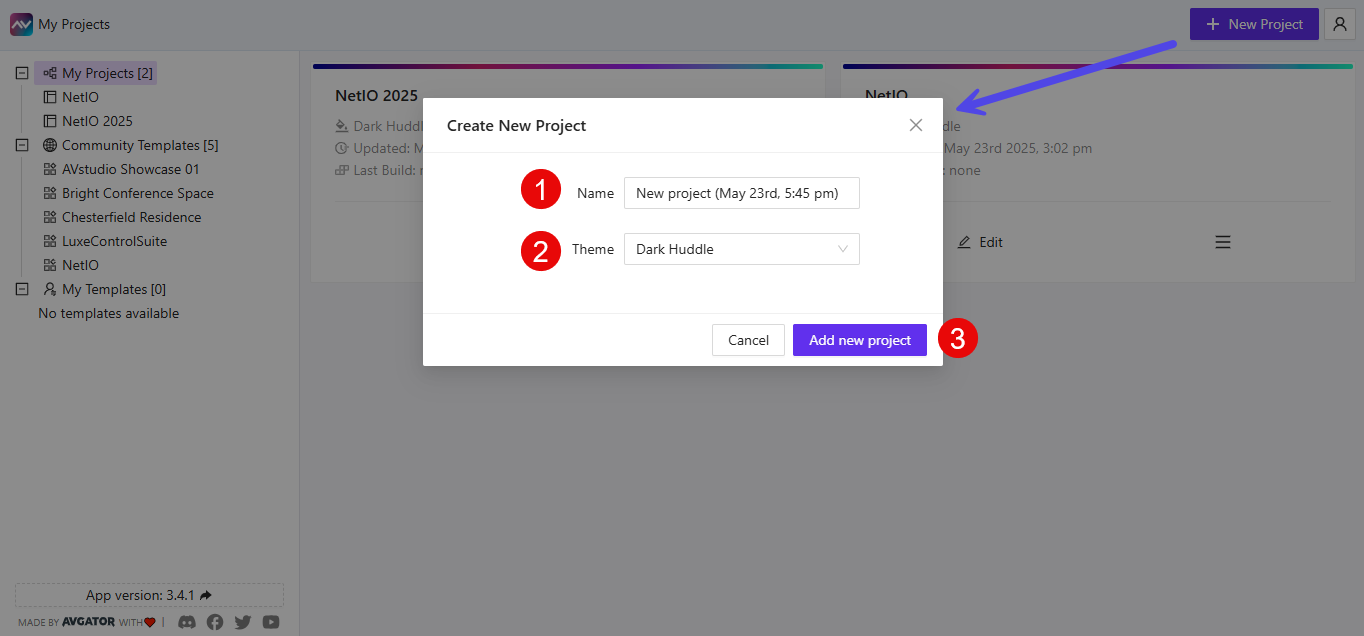
- ① Name – Defaults to
New projectplus date and time. You can rename it. - ② Theme – Choose from available project themes.
- ③ Add new project – Confirms the creation. You can also click
Cancel.
The new project will be added to the list and become available for editing.
Inside the Project Dashboard
Clicking Edit brings you to the core Project Dashboard for that specific project.
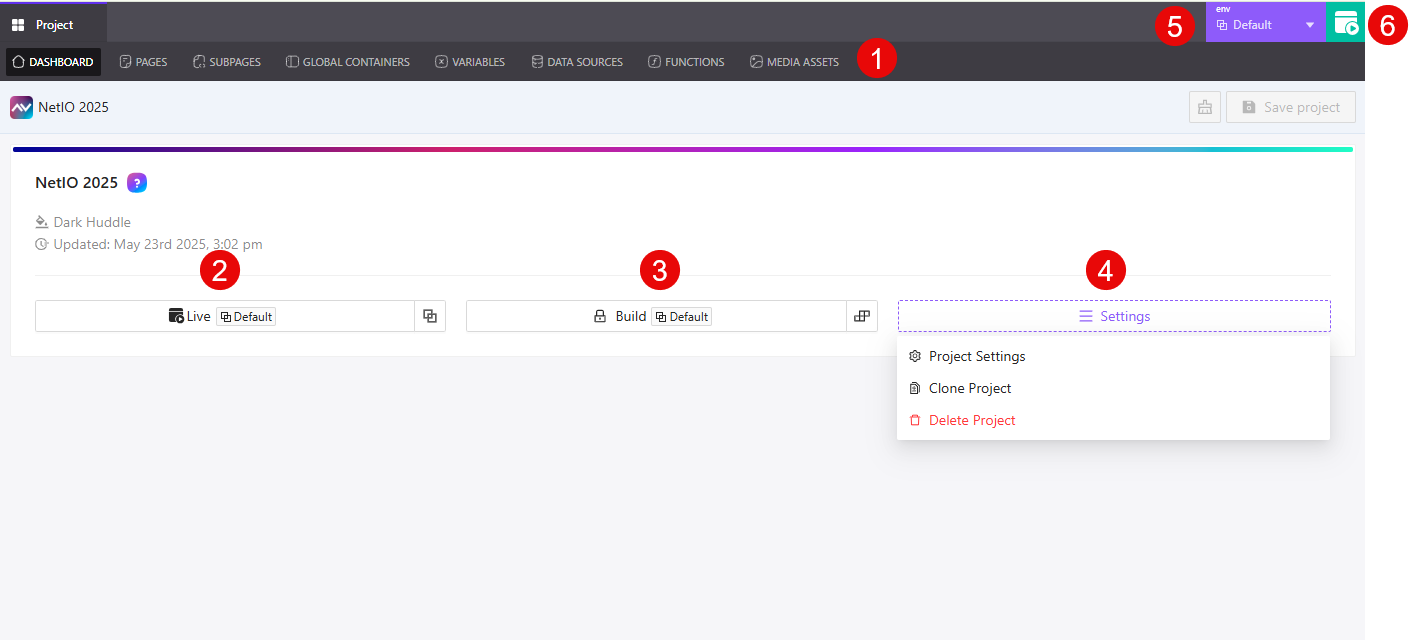
① Navigation Tabs
At the top of the screen, you'll see all the main areas for working on your project:
DashboardPagesSubpagesGlobal ContainersVariablesData SourcesFunctionsMedia Assets
These tabs let you manage your project’s structure and logic.
② Live Preview
Click the Live button to open a fully interactive preview of your project in a new window.
This opens the current environment version of your project. You can navigate, test data interactions, and view the experience as it would appear in production.
③ Build Project
Click the Build button to compile your project into a deployable archive.
You can upload the output to your control processor, device (such as Touch Panel) or backend. Build behavior will follow your selected environment’s configuration.
④ Project Settings Menu
Click the Settings button to open a dropdown with options:
- Project Settings
- Clone Project
- Delete Project
These are also available from the hamburger icon in the main dashboard, but accessible here within the project context.
⑤ Environment Selector
Use this dropdown to switch between project environments (e.g., Default, Production, etc.).
Switching environments updates build configurations, connection settings, and preview behavior.
⑥ Open Project LIVE Preview
This icon launches the Live Preview of your project in a new browser tab, using the selected environment.
It performs the same function as the Live button in section ② but gives you fast access directly from the header bar.
Everything in the Project Dashboard is focused on giving you control over a single project — whether you're editing layouts, previewing in real-time, deploying builds, or updating settings.
Summary
The Project Dashboard concentrates all project-level actions into a single, efficient workspace. By understanding its controls—new project creation, quick actions, live preview, builds, and settings—you can iterate faster and maintain clean, production-ready builds across environments.